Adding a patio to your backyard is a perfect way to create more outdoor living space. You may be surprised to learn that you can tackle this DIY paver patio project on your own. All you need is a solid sand base and some heavy-duty pavers. Once you learn how to lay paving slabs on the sand, you’ll be ready to add a patio of your own.
1. Prepare the Site
Before you begin, you will need to find an area that is both firm and level. Consider all the patio designs and choose the best one that fits your family. Remember that the best location should also drain easily to prevent flooding. Then, remove the topmost layer of soil. Next, add a layer of landscape fabric. This fabric will keep your patio free of weeds.
2. Create a Patio Frame
Once you know what size and shape you’re like your paver patio to then use wood planks to create a frame. Make sure you lay the planks perpendicular to one another and keep your lines straight. This frame will provide you with the outline of your patio, and you can begin planning the design for your slabs at this point.
3. Pour Gravel
Add a thick layer of gravel over the landscape fabric. About 100mm should suffice. It is better to pour too much gravel than not enough. Once your patio is in place, the gravel will allow water to drain through the stones. Make sure the gravel is flat and even. A flat board can help you level any uneven areas.
4. Add Sand
Pour a generous layer of sharp sand over the gravel. Leave enough room at the top to let your stones lay flush against the turf. Sharp sand is easier to lay than concrete, and it is also very sturdy. Pack the sand and make sure it is completely leveled.
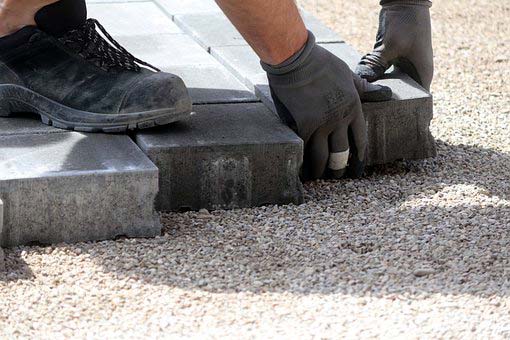
5. Lay Patio Pavers
Now you are ready to learn how to lay pavers on the sand. Start by placing your first stone. Press firmly until it is embedded about 15mm into the sand. Add the next one, leaving a 10mm space between each piece. Be careful to stand on the sand while you lay new slabs. Otherwise, your patio may be uneven and lopsided.
6. Fill the Gaps
Pour sand in the gaps between each paver. Sweep the sand into place, and make sure to fully cover the gaps. Spray the patio with a hose to help the sand settle in the grooves. Continue this process each day until the gaps are completely gone. This may take several days to complete.
Enjoy Your Patio
Now that your project is finished, it’s time to decorate your patio. You can add outdoor furniture if you please. Maybe a colorful indoor/outdoor rug? You will find yourself spending more time in your garden now that you have a proper patio. Hopefully, you’ve enjoyed your DIY paver patio project and now you can take it easy and better enjoy your outdoor space.