If you have a big yard, then you will most likely buy a lawn mower straight away. However, when you have just a couple of patches of grass in your yard, then you might want to rely on other, cheaper options to maintain them. Have you ever thought about a DIY lawn mower?
If you also like tinkering and crafting your own things, then we have just the article for you. In the following paragraphs, we’ll show you how to make your very own mini, DIY lawn mower!
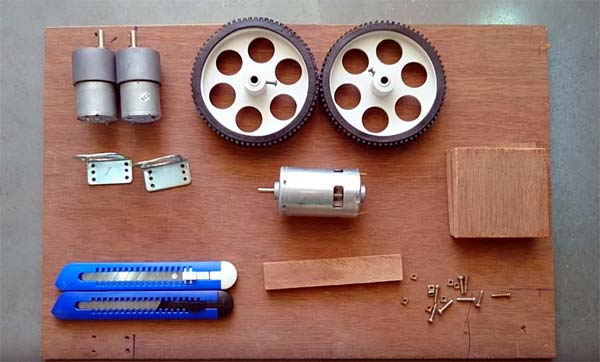
What You’ll Need
In order to take care of your lawn, we’ll first gather all the parts needed for your DIY lawn mower. Everything starts with a piece of plywood or medium-density fiberboard (MDF). It needs to be relatively strong but light enough for the electrical components of the lawn mower that will be mounted on it.
Next, you will also need four wooden cubes. These will serve as support and to which you will later attach the wheels of the mini lawn mower.
Obviously, the four wooden cubes will have to be mounted on the plywood board, in its corners. You will also have to drill holes in their bottom center so that you can mount the wheels.
Electrical Components
For the electrical part, you will need a motor capable of spinning the blades that you will improvise later. One that runs on 12 to 24 volts would do the job just fine!
Depending on the motor’s size and hinge that you have to mount it on, you’ll have to drill a hole of the appropriate size in the center of the plywood board. Naturally, you will need wires, an on-off switch, and a power control unit.
Even though it might be a bit hard to come by, it is recommended that you get a power control unit with its own on-off button, resistor knob, enough terminals for the motor and power supply, as well as a display, in case you fancy seeing the power and speed go up without checking the blades.
Naturally, you will also need a wireless power supply. You can go for one that runs on batteries or, if you feel green, for something that’s solar-powered.
You can get your hands on most of these components from a car. For example, if it has been rendered useless in an accident. However, make sure to ask your car accident lawyer if and when you can tamper with the vehicle.
Wiring
Wiring the whole thing won’t be that hard, as the power control unit will have its terminals marked with +/-, so you will know exactly which wire goes where. Make sure that you have room for all the aforementioned components on the plywood board before you purchase anything too big.
Also, don’t forget the general on-off switch. You’ll have to attach this to the wires of the motor and power control unit wires. Every component can be mounted on the plywood board with the help of screws and drilled holes, or with a very strong double-faced adhesive tape.
Blades
Since we don’t want anything too fancy or dangerous, we will use utility knife blades. Take two of these, screw them together with a bolt and a nut, and then just place them in the appropriate place at the bottom of the motor.
The Bottom Line
Obviously, don’t forget to mount the wheels on the sides of the lawn mower. Also, for increased protection, make sure to shield the sides and the back of the lawn mower’s bottom with a thin wooden board, in case the grass flies away or something goes wrong with the blades. This will ensure that no one will get injured.
As you can see, making your own DIY lawn mower is not hard at all. You just need a board, the ability to drill holes, and some electrical components. As for the cover of the project, well, here you can let your creativity do its thing and come up with some interesting designs!