Before the movers arrive, there’s a great deal to do. In this post, we focus entirely on all your beloved wall hangings. Tip #1: Before anything else, photograph each wall, take items down from smallest to largest, keep every piece of hardware in a labeled bag, and tape the glass across the front. Then check the walls for holes last, when the rooms are empty and the light is good. The rest of this guide walks through each step so nothing gets cracked, lost, or charged against your deposit.
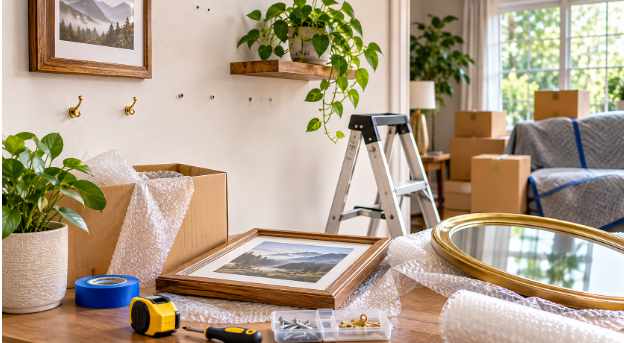
Before the Movers Arrive, Have a Plan and a Few Photos
Before you touch a single frame, take a wide photo of each wall. These pictures do two jobs. They show you how to rehang your gallery wall later and record the wall’s condition before you change anything, which helps if a landlord asks questions.
Renting is common enough that this matters for many households. The U.S. Census Bureau reported that renter-occupied homes made up about 31 percent of the national housing inventory in the third quarter of 2025. If you rent, assume your walls will be inspected when you leave.
Next, walk the home room by room and make a list of what’s hanging. Include the items people forget: curtain rods, towel bars, clocks, and anything mounted above a door. A written list takes five minutes and prevents the “we missed one” moment after the last box is sealed.
Gather the Right Tools and Supplies
Having the right items nearby makes the job faster and safer. Most homes need only a short list:
- A screwdriver or drill with a charged battery
- A small level or a pencil, for marking positions if you plan to rehang right away
- Zip-style plastic bags and a marker, for hardware
- Painter’s tape, which comes off glass and frames without residue
- Packing paper, bubble wrap, and corner protectors
- Flat boxes, or adjustable picture and mirror boxes, for large pieces
- A putty knife, spackle, and a fine sanding sponge, for wall repair
Set up one “landing zone” in each room, such as a bed covered with a blanket. Put frames and mirrors there as you take them down, not on the floor where someone can step on them.
How to Remove Wall Hangings Before Moving, Step by Step
Before the movers arrive, work in a steady order so you never have to carry a heavy item past a fragile one.
- Take down small and light items first. Photos, clocks, and small art are easy to lift and give you room to work.
- Remove medium frames next. Lift each one straight up and off its nail or hook, and check that the wire or bracket on the back is still secure before you set it down.
- Handle large and heavy pieces last, with two people. A big mirror is awkward, and it slips easily.
- Bag the hardware as you go. Put the hooks, screws, and brackets from each piece into one bag, and tape the bag to the back of that frame.
That last step saves the most frustration. Hardware varies more than people expect: a sawtooth hanger needs a different nail than a D-ring needs, and a heavy mirror may use a bracket system that’s hard to match at a hardware store. Taped to the back of the frame, the right hardware travels with the right piece.
If the hanging hardware stays on the wall, label the bag with the room name too. Unpacking in a new home goes faster when you can find the hooks for the hallway mirror without opening twelve boxes.
Take Down Adhesive Strips and Hooks Without Peeling Paint
Adhesive strips are popular because they avoid holes, but pulling them the wrong way can tear paint off the wall. The method is simple once you know it. Hold the frame, find the tab on each strip, and pull it slowly straight down along the wall, not outward toward you. The maker of Command strips, 3M, describes this stretch-release method and says to keep stretching until the adhesive lets go.
A few small habits help:
- Remove one strip at a time rather than yanking the whole frame.
- Keep your hand flat against the wall as you pull to keep the angle low.
- If a strip snaps, warm it gently with a hair dryer and slide dental floss behind it to cut through the foam. Don’t pry it off with a knife.
Warm walls and fresh paint can make adhesive grip harder, so give yourself extra time on paint that is only a few weeks old.
Lift Mirrors and Shelves Safely
Mirrors carry the most risk, because they are heavy and the glass can shatter. Before lifting, run a strip of painter’s tape across the glass in an X. If the mirror is large, add a second X to make a star pattern. Then check how it’s mounted. Some hang on wall hooks, some sit on a metal cleat, and some are glued directly to the wall. A glued mirror is not a DIY job for most people, because the glass can crack as you work it loose.
Shelves need their own approach. For floating shelves and bracket shelves, empty them completely and unscrew them one fastener at a time while a helper holds the weight, so the shelf doesn’t drop and pull the last screw out of the wall. Keep the brackets and screws together in one bag, and tape the bag to the shelf itself.
Related: 5 Key Moving Tips When Relocating for a Job
When a Piece Is Too Heavy or Awkward to Handle Alone
Some pieces are better left to a crew: an oversized mirror, a heavy framed canvas, or a wall-mounted shelving unit anchored into studs. On move day, extra hands cost less than a cracked mirror or a gouged wall. Hiring local movers for apartments and condos is one option when the building has stairs, tight hallways, or an elevator booking window, since the crew can lift, wrap, and carry those pieces while you finish the rest.
Whoever carries it, tell them in advance which items are fragile and which walls have anchors still in place. A thirty-second walkthrough prevents most surprises.
Deal With Wall Anchors and Nail Holes
Once the walls are bare, you’ll see the holes. The key rule for anchors is to remove the screw first. Bob Vila’s home-repair guide notes that a universal method for stubborn drywall anchors is to push them into the wall rather than tear them out and leave a large crater. After that, you can patch over the spot.
For small nail and screw holes, the repair usually takes only a few steps:
- Clean the area and press a small amount of spackle into the hole with a putty knife.
- Let it dry fully. Color-changing spackle makes this easy, since it shifts shade when it’s ready.
- Sand lightly with a fine sanding sponge until the patch is flush.
- Touch up with matching paint, and use primer first if the patch looks dull.
Check your lease before you start. Some landlords want small holes left alone, others expect them filled, and a few handle repainting themselves. Matching paint is the usual weak point, so if you can’t find the exact color, ask the landlord rather than guessing.
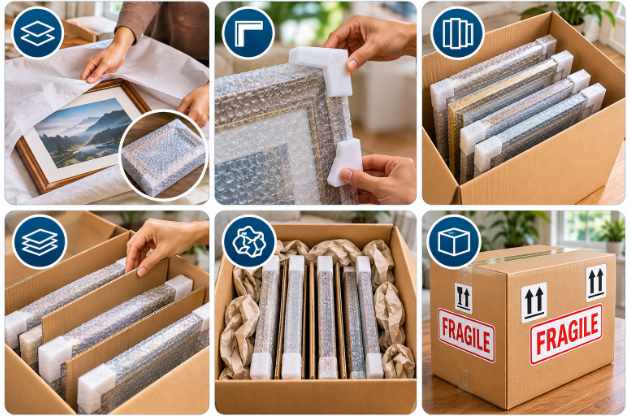
Pack Frames and Mirrors So They Arrive in One Piece
Taking items down is half the job. Packing them well is the other half. The Home Depot’s moving guide for pictures and mirrors recommends an X of tape across the glass, a piece of cardboard over the front, and boxes just a little larger than the item.
Before the movers arrive, follow these habits for every frame:
- Wrap each piece in packing paper first, then bubble wrap.
- Add corner protectors, since corners take the hardest hits.
- Stand frames and mirrors on their edges in the box, never flat.
- Place cardboard between frames that sit face to face.
- Fill gaps with crumpled paper so nothing slides.
- Label the box “fragile” on several sides and mark which way is up.
Pack the box that holds your hardware bags last, and keep it with you rather than on the truck. A small box with a screwdriver, a level, and every hook bag makes your first evening in the new place much easier.
Frequently Asked Questions
Do I need to remove wall hangings before the movers arrive?
Yes, in most cases. Take down everything that hangs on walls before the crew starts, because loose frames and mirrors can fall during loading. Pieces anchored into studs or glued to the wall are the exception, so tell the crew in advance and ask how they want to handle them.
What should I do with nails and hooks after I take pictures down?
Put the nails, hooks, and screws from each item into a small labeled bag and tape it to the back of the frame. That keeps hardware matched to the right piece, which matters for heavy mirrors with special brackets. Put any leftover hooks into one labeled box for the new home.
How do I remove a heavy mirror from the wall?
Tape an X across the glass, then use a helper to lift the mirror straight up off its hooks or cleat. Never twist it sideways or pull one side away from the wall. If the mirror is glued down or mounted on a wall plate you can’t see, ask a professional to remove it.
Will removing adhesive strips damage my walls?
It can, if you pull them outward. Pull the tab slowly straight down, keeping your hand close to the wall, until the strip lets go. If the strip tears, warm it with a hair dryer and slide dental floss behind it. Brand-new paint and rough surfaces carry a higher risk of peeling.
Should I fill nail holes before moving out of a rental?
Check your lease first. Many landlords expect small holes to be filled and painted, while others prefer you leave them alone. If filling is expected, use spackle, sand it smooth, and touch up with matching paint. Take photos of the finished wall so you have a record of its condition.
Leave Every Wall Ready for the Next Chapter
Bare walls are the last thing you’ll see before you hand over the keys, so they deserve a few minutes of attention. Do one final walk-through with your photos, a flashlight, and the hardware list, and make sure you haven’t missed any hook, anchor, or sneaky towel bar.
If you take only one habit from this checklist, make it taping a bag to the back of every frame. It costs pennies, and it means your first night in the new home starts with hanging pictures instead of hunting for the right screws.